OU blog

Personal Blogs

Christopher Douce

Learning outcomes in the classroom

Visible to anyone in the world
Edited by Christopher Douce, Wednesday 4 November 2026 at 20:34

On 17 December 2024 (yes, it is really that long since I started this blog post) I attended a continuing professional development (CPD) event that was hosted by the graduate school, facilitated by Dr Judith Taylor and Dr Helen Bowes-Catton. What follows are some notes that I have edited together after attending the session.

I wasn’t the intended audience. It was aimed at doctoral students to help them understand more about the higher education (HE) sector. I don’t think anyone minded me coming along, since it was also advertised to doctoral supervisors.

The session was all about what is distinctive about teaching in HE, how it is changing, what learning outcomes are, how learning outcomes are used in teaching and assessment, and what benchmark statements are (which is a topic that I have explored in a blog not so long ago). The session also had a practical element (which I didn’t take part in).

A bit about theory...

I must confess that I arrived a little late, missing a summary of Bloom's taxonomy (Armstrong, 2010). I’ve known about Bloom's taxonomy (along with another ‘triangle model’; Maslow’s hierarchy of needs) for quite some time. Bloom’s taxonomy is a useful tool to think about different types of knowledge and understanding. For educators, it helps us to think about how we might approach the development of student’s critical thinking skills.

Like any useful tool, it is pretty simple. Bloom’s Taxonomy is divided into levels. The lowest level is knowledge (recalling, locating and naming concepts), followed by comprehension, application, analysis, synthesis, and evaluation (where students are able to compare theories and ideas). The higher up the level, the great the level of mastery.

Introducing learning outcomes

I’ve recently written about learning outcomes in a blog that introduces a set of useful ideas (which I wished someone had told me about when I first joined the university). Here’s a simple definition: a learning outcome is a simple statement of what students should know, or be able to do, by end of a session, module or course.

A learning outcome also specifies what we want students to achieve to gain a pass. We might break down big learning outcomes into smaller ones. We were given a tip about writing them. Avoid passive verbs. Instead, use action verbs; use words that are precise, level appropriate and relate to the development of concepts and skills. Some useful words might be demonstrate, construct, analyse, or explain. Learning outcomes should be measurable and observable.

Constructive alignment

Learning outcomes, or 'outcomes-based learning design' is also related to an idea called Constructive Alignment Theory, which has been defined by Biggs (2003). The simple point is that everything aspect of study should be aligned with every other aspect. Curriculum should be aligned with its learning outcomes, the teaching methods used, the resources used, and the assessment tasks and accompanying criteria used to evaluate whether learning has taken place.

I noted down a couple of useful bullet points:

  • Constructive alignment in the classroom: what do I want them to learn, what types of activities will help, how will I know they have achieved the LOs?
  • Constructive alignment for quality alignment: LOs are used between institutions, in your institution, and by you and your students.

Threshold concepts

We were then introduced to the idea of a threshold concept (Mayer & Land, 2006; Cousin, 2006); the one thing (or set of things) that your students really need to know to enable them to progress to higher levels of study.

Teachers, tutors or lecturers should aim to identify the threshold concepts that are important to their subject, and then attempt to devise techniques (pedagogy) that help students attain those tricky concepts.

Benchmark statements

We were all asked a question: how do we determine that the quality of a degree from one institution is the same as a degree from another institution?

The answer is: QAA plays a role in ensuring that the levels of attainment are equivalent. If you are teaching a subject, you have to agree to certain benchmark standards. All university degrees should meet a standardised criteria.

Reflections

When I started as a tutor, I didn’t know any of this stuff. I could have really benefited from a session like this, which introduced me to some of what I describe as ‘the really important simple stuff’. I first came across Biggs’ ideas when studying for a postgraduate teaching qualification. Sometimes it is simple ideas that can help us to understand more complicated ones.

One of the references I picked up was an edited book by Ketteridge et al., which is available through the university library, which looks really useful (except there isn’t a chapter on teaching computing, but there is a chapter on teaching dentistry). Parts 1 and 2 look helpful, with part 2 addressing the topic of research degrees.

References

Armstrong, P. (2010). Bloom’s Taxonomy. Vanderbilt University Center for Teaching. Available at:  https://cft.vanderbilt.edu/guides-sub-pages/blooms-taxonomy/.

Biggs, J. (2003) Aligning teaching for constructive learning. Higher Education Academy.

Cousin, G. (2006) ‘An introduction to threshold concepts’, Planet (17). Available at: https://www.ee.ucl.ac.uk/mflanaga/Cousin%20Planet%2017.pdf

Ketteridge, S. et al. (2014) A Handbook for Teaching and Learning in Higher Education: Enhancing Academic Practice, Taylor & Francis. Available at: https://ebookcentral.proquest.com/lib/open/detail.action?docID=1770537.

Meyer, J. and Land, R. (2006) Overcoming Barriers to Student Understanding: Threshold Concepts and Troublesome Knowledge. Routledge. Available at: https://doi-org.libezproxy.open.ac.uk/10.4324/9780203966273

Acknowledgements

Many thanks to Judith and Helen for this session.

Permalink Add your comment
Share post
Christopher Douce

Tutoring: key ideas

Visible to anyone in the world

This short post is a part of a larger writing project to create a helpful guide for tutors. Sometimes these posts share what might seem the blindingly obvious, but sometimes it is helpful to say the blindingly obvious. What follows is a set of useful definitions for some key terms and ideas.

Module codes

Module codes begin with a group of letters, and then have a group of numbers. The letters refer to a curriculum area, and the first number relates to the level of study. If you tutor computing modules, you will see modules that begin with M, modules that begin with T, and modules that begin with TM. M modules were historically hosted within the Maths and Computing Faculty, and the T modules were from the old Technology bit of the faculty.

Sometimes, you might see letter X, Y and Z in modules codes. These codes relate to either special projects, or special versions of modules. Don’t worry too much about what these codes mean; if you are working on a module with an unusual module code, your line manager will be able to help. Access level modules typically begins with the letter Y. If an access module contains the letters FT, this relates to a ‘fast track’ version of a module, where some students starts at a different date.

Access level modules have a number that begins with zero. Undergraduate modules contain numbers that begin with the numbers 1 through 3. Sometimes there is a level 4 module code, which is applied to special dissertation modules. Postgraduate modules, on the other hand, typically begin with the number 8.

Module presentations

Module presentation codes begin with a year, and then a letter. The letter is shorthand for the month in which a module presentation begins. If you take the first 12 letters for the alphabet, A = January, B = February, C = March, and so on. A module presentation code 29J is a module that begins in October 2029.

Academic credit

Modules are described in terms of academic credit. Academic credit is awarded for study that has been completed. To get a degree, students need to complete 360 points of academic credit. If students were to study at a full-time study intensity, 120 can be usually studied in one year. One academic credit point amounts to 10 hours of study. More information about how academic credit works can be found in the Curriculum blog.

FTE

Tutors are typically employed for a number of hours per calendar year, which is expressed in terms of FTE, or Full-time Equivalent. More details underneath the notion of FTE can be found in the article: Understanding your FTE.

Pedagogy

Pedagogy is one of those words that you will see a lot, but it is also one of those words that is rarely defined since there’s an assumption that everyone knows what it means. Pedagogy is knowledge of how to teach. Knowledge of pedagogy is implicitly expressed within the design of modules. It is also expressed through the work that tutors do, such as facilitating tutorials, marking assignments, answering questions, and working within others. A related term is andragogy, which means knowledge of how to teach adults. An important principle of andragogy is that adults have existing knowledge and experience, that can be used and shared to develop an understanding of module materials. An engineering module may well attract students who are practicing engineers. A skilled tutor will be able to draw on the experience of students in a way that enriches and contexualises module materials.

Reflective practice

Linked to pedagogy, there is the idea of reflective practice, which is (in my opinion) the biggest idea in education. It is, in fact, really very simple. Before teaching (whether this is facilitating a tutorial, or leaving feedback comments), it is important to reflect on (to have a careful think about) what needs to be done to enable students to understand something. After the teaching has taken place (enacting of practice), it is then important to reflect on (to have a careful think about) whether the teaching was success or not, and whether some refinements could be made to make it better. This reflection could be done informally, or formally through a scholarship project that might apply a methodology known as action research.

Learning outcomes

The concepts and ideas that are taught by modules are often described in terms of learning outcomes. A learning outcome is sometimes expressed in terms of knowledge and understanding of concepts, cognitive skills, and key skills (which may also be important within a workplace). In addition to module learning outcomes, there may well be programme level learning outcomes, which relate to name degrees. These higher level learning outcomes are often related to sector-wide educational norms, such as subject standards that are defined by the Quality Assurance Agency for Higher Education (QAA).

Constructive alignment

Constructive alignment is the idea that everything should work together. If the aim of a module is to help a student attain a set of learning outcomes, the assessment for that module should aim to assess whether its learning outcomes have been met. Tutorials should also be designed so they align with module learning outcomes as should the advice given to tutors by module teams. In turn, the feedback offered by tutors should also link back to knowledge and understanding, and skills that are expressed within learning outcomes.

Educational frameworks

Learning outcomes and constructive alignment are practical tools that help to structure module materials, and help us to begin to understand what we need to teach. These ideas represent the beginning of a bigger topic; education theories and frameworks. What follows are two frameworks that can be useful in understanding tutoring and tutoring practice. It the big ideas they present and embody that are important.

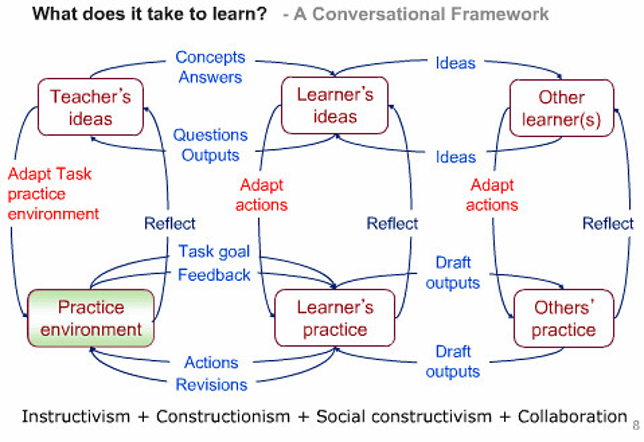
Laurillard’s conversational framework

Education is, ultimately, all about people. Tutors speak with students. Tutors speak with other tutors, and students speak with other students (through the VLE, through collaborative activities, or through social media).  

Laurillard’s framework shows the variety of conversations that can take place.The diagram shows how different communities of people interact. The people highlighted are: teachers, learners, and other learners. Teachers learn from each other, and share ideas. Learners learn from others.the diagram shows that everyone carried out reflection.

Figure 1: Laurillard’s conversational framework

Since it is a framework, it doesn’t predict what could happen. Instead offers an idea that can be used to understand teaching practice. It also implicitly emphasises the importance of belonging to an academic environment, a ‘practice environment’.

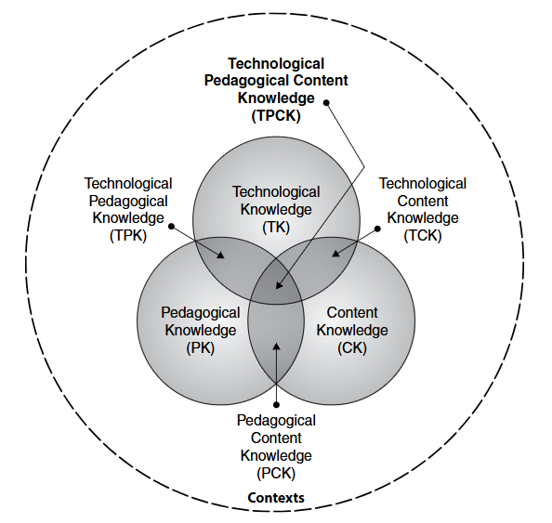
TPACK framework

I really like the TPACK framework by Mishra and Koehler because of its conceptual simplicity:A set diagram shows the intersection between technical knowledge, content knowledge and pedagogical knowledge.

Figure 2: Mishra and Koehler’s TPACK model. See Herring, Koehler, and Mishra (2016).

When teaching using technology, you need to apply different types of knowledge. You need to know how to teach in a general sense (it is helpful to know something about learning outcomes and constructive alignment, for example). You need to know how to teach the difficult parts of your subject. You also need to know how to teach using your online teaching tools. You only become really effective as a tutor when each of these three aspects are combined together, as shown by the intersection in Figure 2.

Resources

The following OpenLearn course share further details about the role of reflection in education: Learning to teach: becoming a reflective practitioner.

Within the AL professional development section of your TutorHome pages, there is a useful VLE site called Reflective Toolkit for Teaching Practice. The theories and models of reflective practice section complements the earlier educational framework section.

Another resource that is both interesting and useful is the Supporting Open Learning (SOL) Theoretical Reader, which can be found within the Booklets and articles archive section of the AL Development section of TutorHome. Although the SOL booklets are now showing their age, they still have relevance.

References

Herring, M.C., Koehler, M.J. and Mishra, P. (2016) Handbook of technological pedagogical content knowledge (TPACK) for educators. Second edition. Routledge. Available at: https://doi.org/10.4324/9781315771328.

Mishra, P. and Koehler, M.J. (2006). ‘Technological pedagogical content knowledge: A new framework for teacher knowledge’. Teachers College Record, Vol. 108, No. 6, pp.1017–1054.

Laurillard, D. (2001) Rethinking University Teaching: A Conversational Framework for the Effective Use of Learning Technologies, Taylor & Francis.

Acknowledgements

Thanks are extended to Diana Laurillard who gave permission to share a presentation slide that was featured in an earlier blog post, published in 2009.

Permalink Add your comment
Share post
Christopher Douce

TM470 TMA and EMA template

Visible to anyone in the world
Edited by Christopher Douce, Tuesday 11 March 2025 at 10:58

TM470 is different to other computing and IT modules. The most significant differences is that the aim of the project module is to show off your skills and abilities, and build on what you have studied in earlier modules.

The module team have introduced some changes at the start of the February 2025 presentation. One of their really welcome changes is that they have now introduced a recommended ‘draft structure’ for each of the assignments. Interestingly, this template can also be applied to everyone’s EMA submissions too. 

A notable difference between TM470 and other modules is that all assignments assess all the learning outcomes from the module, but at a different level of intensity.

What follows is my own version of the module team’s TM470 TMA and EMA template, and continues from an earlier blog post entitled TM470 Project report structure. Some of the sections outlines here will, of course, be more appropriate in some TMAs rather than others. In the early TMAs, some of the sections will not have very much in them. All project reports should have a similar structure, but they will differ substantially in terms of content. Every project will have a different ‘project work’ section, which will have a structure that will reflect the tasks identified in your project plan.

I do ask everyone to number each top level section, other than the opening table of contents and the closing summary of references. The reason for this is that numbering makes it easy to provide cross references between each of the sections without having to write too many words.

Before summarising the suggested structure, I have three tips for students:

1. Ensure that your report is as readable as possible (but do make sure it remains a formal report). The project marker may be unfamiliar with the subject that you are writing about. Take time to set the scene and explain concepts that may be unfamiliar to a reader.

2. Do have a look through the OU Skills for Study resources (OU website). In particular, I’m a fan of The Good Study Guide which you can find through the OU study booklets page (OU website). The Good Study Guide offers some really helpful advice about researching and writing.

3. Think of the project report as a ‘technical narrative’, or a ‘technical story’. It is also a story that can contain other narratives. There is a story about your planning, a story about your reading, a story about what has been done, and what has been learnt. Make your technical story as interesting as you can.

Onto my suggested structure (which has been developed from official guidance from the module team). Within the structure, I also highlight how each section relates to each of the module learning outcomes:

Project Title

Begin with a title page where you give your project a short and descriptive title. A good rule is: no more than 10 words, but ideally around 6. Present the title in the Word Title Heading style. Underneath the title, do leave your name and your student number.

This first page links to the following learning outcome:

LO2 (Project Goals) Identify and refine the goals and content of your project which should be within the area of your chosen specialist route, if applicable.

Contents

The next page should share a table of contents. Don’t spent the time creating one by hand; get Word to create one for you. You can do this by using the Word in built header styles to indicate the start of every section and subsection. You can then create a table of contents by pressing on the table of contents button that is located within the references menu. (The exact location of this feature may vary depending on the version of Word that you’re using). In addition to being able to create a table of contents page, using the Word in built headings also enables you to use the document navigation tool, which can be really useful when your project gets larger and more complicated.

A well structured table of contents relates to the following learning outcome:

LO7 (Communication) Communicate information, ideas, problems and solutions clearly.

1. Introduction

In this first opening section of your report, write a really short introduction to the whole of your project. Try to summarise it in a couple of sentences. Then, provide the reader with a pointer towards what they can expect to see in the next sections. This will ‘prime’ them for what is coming up in the next section. You might also want to allude to what you have achieved, but don’t tell them everything; this is presented in the next sections. 

Although this section is the first section the examiner will read, this will be perhaps one of the last sections you will write. When you’ve finished writing your project, it is a good idea to loop back to make sure it continues to reflect the aims and objectives of your project.

This section speaks to the following learning outcome:

LO2 (Project Goals) Identify and refine the goals and content of your project which should be within the area of your chosen specialist route, if applicable.

2. Problem description

In this section, go into a bit more detail about what your project. You might want to explain a bit more about the project context or setting. Background information will help the EMA examiner to understand what your project is all about. In some ways, think of the opening sections of the report as a ‘spiral’, where you gradually lead the examiner towards the detail of what you’ve done. In some way, you’re teaching the reader about your project.

LO2 (Project Goals) Identify and refine the goals and content of your project which should be within the area of your chosen specialist route, if applicable.

3. Planning and resources

The module team section call this section Resources and Planning. I personally feel that it reads better if it is the other way round. My motivation for this is that before you use something (your resource), you need to know what you’re going to be doing with it (your plan). Admittedly, this heading does break my implicit rule of including an ‘and’ into heading titles, which I really hate (an ‘and’ almost suggests that there needs to be more than one heading), but it does relates to two learning outcomes, which are:

LO3 (Determining resources, skills and activities needed) Identify, list and justify the resources, skills and activities needed to carry out the project successfully. Identify and address any associated risks.

LO9 (Planning and organising work) Plan and organise your project work appropriately, and keep systematic records of plans, progress and outcomes.

In the previous section, you’ve told the examiner what you’re going to do. This section is all about how you’re going to do it. Since sharing detail about your project plan is important, it is a good idea to split this section into a number of subheadings.

3.1 Project Model

A suggestion is to begin by telling the examiner about the project model you’ve chosen. Do have a look at the module materials about this, and what this means. In other words, you could use this section to summarise the project planning approach that you have chosen. A good approach is to present a table to show that you have thought about the various advantages and disadvantages of each of the different approaches, concluding with a decision about which module you have chosen, and why it has been chosen.

3.X Resources, skills, activities, risks, plan…

What might follow is a series of subsections about resources that you need, skills, potential risks to the project, and also something about this high level plans. Do say something about what you’re going to be doing, and also what tools you might have used to decide on what you’re going to be doing and when.

What I always like to see is a list of resources that are needed or will be used, a very high level list of activities (perhaps presented in the form of a table), another table that considers the risks to your project, and then a detailed Gantt chart. The structure of your Gantt chart should reflect your project model. If you use an iterative approach, this should be visible within the structure of your plan.

4. LSEPI and EDI

Legal Social Ethical and Professional Issues (LSEPI) and Equality Diversity and Inclusion are important in TM470. As future Computing and IT professionals, it is important to be mindful about the impact of a project or development on wider society, and any implications it might have. Also, if a project involves working with people to uncover requirements, it is important that you treat everyone in an ethical way. The module team offers a bit of guidance about this topic, but for further inspiration it might be a good idea to have a quick look through the British Computer Society Code of Conduct  (BCS website). The Association of Computing Machinery code of ethics also offers some helpful principles.

EDI is intrinsically connected to LSEPI. If you’re developing an app or a software system, you need to consider its users. This might mean making it as accessible as possible for users of assistive technologies, for example. There is a link here to UK legislation, such as the equality act.

I’ve historically recommended that LSEPI and EDI sections are presented early on in the project report. I’ve even been recommending that it should occur before the literature review section (which follows), but I accept this might well be a moot point. My argument is: if significant LSEPI and EDI issues that relate to your project, you need to read about them properly, which means adding to your literature review. Adding them on the end does make it feel as if they are a bit of an afterthought, but I know that certainly isn’t the intention.

Here's the learning outcome for this section:

LO10 (LSEPI & EDI) Identify and address the legal, social, ethical and professional issues (LSEPIs) and the equality, diversity and inclusion (EDI) concerns that may arise during the development and use of computing and IT systems. Include project approval form as Appendix 1.

5. Literature Review

The project team call this section ‘Account of Related Literature’. I prefer the simpler ‘literature review’.

This section is all about showing the examiner what you have read or studied, and how this has influenced the project work that have done. There are different ways to structure a literature review. Two ways are: by theme, or by time. In other words, by the subjects that you have read about, or the order in which you have read things. I always prefer thematic literature reviews since they enable the writer to adopt a more critical approach. This means you can more directly and easily compare and contrast different opinions from different sources.

In this section, do try to reference as widely as possible. Do take the time to reference other modules you have studied (including textbooks and module blocks), any technical textbooks you might be using in the next section, and also do a bit of digging into the OU library (which all students have access to).

Fellow tutors have offered the following guidance: “show you understand the importance of a source; show you recognize the limitations of your sources; show how the literature has influenced the direction of the project and informed your thinking, and show how the literature has justified decisions”.

Here are the learning outcomes that are demonstrated in this section:

LO4 (Gathering, analysing and evaluating information) Gather, analyse and evaluate relevant information to complete the project successfully.

LO6 (Making effective use of information) Make effective use of a variety of information sources including the internet, demonstrating awareness of the credibility of the source.

6. Project Work

I used to call this section ‘account of project work’, but I think a heading with two words is better.

This is one of the most important sections of the report. It shows the examiner what you have done during the course of your project. It should ideally be a series of case studies that presents a narrative (story) of what you have done, and should relate back to the plan that you have described. To structure everything, it is a good idea to separate everything out into a series of subheadings; one for each mini case study.

Drawing on comments from fellow TM470 tutors, the examiner needs to get a feel for the project as a whole, the solution you created, and whether you solved the problem. Importantly, this section should demonstrate your technical and presentation skills, and should be concise.

If you have a project where you have generated a lot of materials, such as interview scripts, survey results, source code, or diagrams, you need to make a choice about what goes in this section, and what you choose to put in an appendix. One way to answer this question is to ask yourself: is this an example of my best work? If so, put something in this section.

Again, here are the learning outcomes:

LO1 (Understanding Technical Concepts) Demonstrate and apply a systematic understanding of the fundamental technical concepts and principles relevant to your project.

LO11 (Analysing and solving a practical problem) Analyse a practical problem and devise and implement a solution which should be within the area of your chosen specialist route, if applicable, building on, and extending, the knowledge and skills developed throughout your earlier OU studies and experience.

7. Review and Reflection

I think the module team call this heading ‘personal development’ which feels a bit general for what it is. 

By the time you get to this section, you would have prepared a plan, have done some research, and have carried out some project work. This section is all about telling the examiner what you have learnt from the experience of running your project. 

To help you to begin to answer this question, think of those “WH” questions: what, how, when, and why? Ask yourself the following questions: Did you follow your plan? Did you learn the right thing, and the right time, to solve the right problem? How did what you learn help or hinder your project? Also, how did you expand on your level 3 studies?

The more thoughtful your review and reflection section appears, and the more that you appear to have learnt by completing the project, the more evidence there will be that you have obtained some of the TM470 learning outcomes.

LO5 (Critically reviewing approach so far) Critically review how you have tackled the project.

LO8 (Learning Independently) Learn independently and reflect on what has been done, with a view to improving skills and knowledge.

8. Summary

I’ve received a query from a student who was asking what was supposed to go in the epilogue. Rather than an epilogue, I recommend that students to write a short summary. A suggestion is: offer a reminder about what the project was all about, what project model was chosen, summarise what has achieved, and then to share three things that have been learnt by completing the project. Your final summary should mirror the introduction section.

This short final section speaks to the project goal learning outcome, the outcomes which relate to technical work, and the review and independent learning outcomes.

References

In academic reports, there is always a references section, but sometimes there can also be a bibliography. I understand that a bibliography is ‘stuff that has been read that have more generally informed the project’. Being vaguer isn’t necessarily helpful when it comes to good academic practice. My recommendation is to ditch a bibliography section, and only have a references section. A references section should present what resources you use.

Clear referencing is really important. One of the aims of this section is to enable the examiner to find an original source, report, textbook, or anything else that has helped you with your project. A useful principle that I’ve heard is ‘anything in the world can be referenced one way or other’. If you’ve used a tip that you’ve found on a website, a bit of software, or an idea from a module, you should reference it.

Make sure that you present everything in alphabetical order, and mention dates of publication. If you’re unsure how to format any resource, book, paper, technical report, or bit of software, do refer to the CiteThemRight website.

Appendix 1 - Project Ethics Checklist

Every project should have an appendix 1 section, which is a copy of an email sent to your tutor that gives ethical approval for your project. A recommendation is to copy/paste the email into this section. The simplest approach to sharing it is probably the best.

If the aim of your project changes, part way through your project, you should always submit a new ethics form. You should include the latest approval email you have received, but you might also want to share earlier versions if it is appropriate to do so. This relates to LO10, which is all about LSEPI and EDI.

Appendix 2 - Project Log

When working on your project, I recommend that all students create a project log. This could take different forms. It could be notes saved in a Word document, notes in an actual paper based notebook, or it could be an email summary sent to your tutor every couple of weeks; these emails could be combined together to form a log of all the work that you have been carrying out. Providing this appendix gives further evidence to support your achievement of LO5. Plus, you can refer to your log in your reflection section.

Appendix 3 - Original Gantt chart

As you make progress on your project, a recommendation is to regularly review your project Gantt chart. It is likely it will change; some of the risks that you have previously written about may (or may not) have materialised, and you may have to adjust your schedule. To help with your reflections, a strong recommendation is to keep a copy of your original Gantt, which you can share as an appendix in your final report. Sharing two Gantt charts will give you something to talk about in your reflection and summary sections. Providing this appendix provides further evidence to support LO5 and LO9. 

Further Appendices

A project report can have any number of appendices in addition to the three that are suggested. You can use an appendix to share supplementary materials to help the examiner to get a feel for what you’ve done during the course of your project. 

There are no hard and fast rules about how many appendices you should have since every project is different. You might use them to show excerpts of source code, diagrams, consent forms, and data that you might have collected during the course of your project. Whatever works best for you. You should, however, always reference each appendix from within the body of the report, just to make the examiner aware that this may be an important part of your report.

Although you must try to limit your project report to 10k words, there is no limit to how many additional words you can provide within the appendices (but the module team does encourage everyone to be reasonable).

Give your appendices a letter, as well as a title. The letter is for cross referencing. The title is, of course, for the reader.

Final points

All these sections of your project report address a really important learning outcome, which is:

LO7 (Communication) Communicate information, ideas, problems and solutions clearly.

When it comes to writing your project report, a really important tip is: make it an interesting read. Whilst this will not, on its own, lead to a higher EMA score, an interesting and readable EMA will help the examiner to relate all the learning outcomes to your submission. 

Acknowledgements

You can include an acknowledgement section in your project report, along with a glossary if you feel it is appropriate to do so. In this post, I would also like to acknowledge Alexis Lansbury, TM470 module team chair, and fellow TM470 tutors for their help and advice.

Permalink Add your comment
Share post
Christopher Douce

TM470 Learning Outcomes

Visible to anyone in the world

TM470 is the Open University’s Computing and IT project module. It is what is called a capstone module, which is studied towards the end of the Q62 Computing and IT BSc qualification. It is an important element, since it is linked to the degree being recognised by the British Computer Society (BCS)

If you study this this module, you are required to carry out a substantial project which demonstrates your learning that has taken place on earlier modules. It is also used to develop your project management skills. Given the final output from the module is a project report TM470 also helps to develop your writing skills.

Like many other modules, TM470 is assessed through a series of learning outcomes. To pass the module, you must demonstrate that you have met these outcomes. This means that you need to provide sufficient evidence in your project report to ensure that the examiner can see that you meet all the criteria that are embodied within those outcomes.

A fellow tutor has described TM470 as a bit like a very long assignment (or end of module assessment). Every tutor marked assessment (TMA) is designed to help you to move towards the writing of your end of module assessment. As you study the module, it is recommended that you review the learning outcomes of each TMAs. Different TMAs will be assessing different learning outcomes. In turn, this will take you to the EMA, and its learning outcomes.

What follows is a brief summary (and my own interpretation) of the learning outcomes that relate to the module EMA, which is the same thing as the project report. A full summary of the learning outcomes and the accompanying assessment criteria is, of course, available through the module website.

Before looking at all the outcomes, I should note that these are my own notes, and my own opinions, rather than that of the module team. Always refer to the module team materials for official guidance.

Interpreting the TM470 Learning outcomes

LO1: Demonstrate your understanding of technical concepts relevant to your project

I have paraphrased this learning outcome from the original version: demonstrate and apply a systematic understanding of the fundamental technical concepts and principles relevant to your project. In other words: you need to do stuff to show what you have learnt from your earlier studies. There is an implicit link between this learning outcome, and learning outcome 11.

LO2: Identify and refine the goals and content of your project

This is all about the aims of your project. Does it solve a specific and easily defined problem that can be described in a few concise sentences? A quick check is: does it make sense if you explain your project idea to someone who doesn’t know what you have been studying? Does it solve a real need? Do refer to the module guidance about what constitutes a good project aim and idea.

LO3: Skills, resources and activities

The full outcome is: identify, list and justify the resources, skills and activities needed to carry out the project successfully. Another part of this outcome is: identify and address any associated risks. If there evidence of each of these elements? Do you consider what resources you need, such as software, or people? Also, how about risks? Is there evidence of how you have considered risks? Are these risks sensible?

LO4: Gather, analyse and evaluate relevant information

In my eyes, this theme cross cuts a couple of sections. Is there evidence of your reading in your report, by way of a literature review section? Also, when it comes to make decisions about what to do with a potential design, have you documented what you think is important. In other words, is there enough information that enables the reader of your project report to understand the story of what was done within your project?

LO5: Critically review how you have tackled the project

This outcome is one of the two outcomes that is all about reflection. If you don’t get everything working as you had hoped, or things didn’t go to plan, don’t worry. Instead, do tell the examiner about it. Importantly, tell them why you thought it didn’t go well, and what you have learnt from it. Also, do assess whether you felt your original plans were appropriate. During the planning of your project, thinking about risks is important. Did you go overboard on your risk planning?

LO6: Make effective use of a variety of information sources

This outcome is linked to LO4, but it is more about your reading, and how what you have read has informed what you have done. You also need to demonstrate that you have drawn on sources that have academic credibility. Whilst blog posts (such as this one) can be useful, they don’t hold as much weight as books or formal articles. An element of the project report is to demonstrate not only your practical skills, but also your academic skills. In turn, you need to make sure you reference everything clearly. 

LO7: Communicate clearly

The full title of this outcome is: communicate information, ideas, problems and solutions clearly. In other words, you must demonstrate that you’re able to write a well written report that describes what you’ve done. A really useful bit of advice I was once offered was: “make sure what you write is as interesting as it can be”. Academic writing, whilst formal, doesn’t have to be boring. Put a bit of yourself into your writing, especially when it comes to the reflection section.

LO8: Learn independently and reflect on what has been done

This outcome is all about reflection. When looking back across your project, it is okay to get a bit more personal. This outcome is all about saying what you felt went well and what went badly, what you have learnt, and whether there were any surprises. Also, do you now know something new about yourself and how you work, than you did before?

LO9: Plan and organise your project work

The full outcome is: plan and organise your project work appropriately, and keep systematic records of plans, progress and outcomes. This outcome is linked to learning outcome 3, which is about resources, activities and risks. In your report, is there evidence of creating a plan? A practical tip is to great a Gantt chart, but break it down into a fair amount of detail. This said, don’t make it too detailed, as otherwise you’ll spend too much time updating your plan and not doing any project work! A further practical tip is: do begin a project log, and put this as an appendix. This will help you when it comes to the learning outcomes that are all about reflection.

LO10: Ethics, equality and diversity

A more detailed heading for this outcome is: identify and address the legal, social, ethical and professional issues (LSEPIs) and the equality, diversity and inclusion (EDI) concerns. Since computing systems can have real impact within society, and to individuals, it is important to consider what these are. There should be a section within your report that addresses this, and concerns about ethics should inform what you do, and how you approach the different stakeholders.

LO11: Analyse a practical problem and devise and implement a solution

The full learning outcome is: Analyse a practical problem and devise and implement a solution, which should be within the area of your chosen specialist route, if applicable, building on, and extending, the knowledge and skills developed throughout your earlier OU studies and experience. Put another way, you should demonstrate what you already know, what you have learnt, along with what skills you have gained from earlier study, and what skills you have developed during the period of the project. You should do all this through your project report. 

Summary

TM470 is very different to OU modules that teach a particular topic, since so much of the decision making about what you do, and what you write about is up to you. The module begins to make sense if you think in terms of producing ‘something’ (a project report) that demonstrates your skills and abilities. I often tell students that TM470 is all about showing off your skills and abilities, i.e. showing off to the examiners what you have learnt, and what you can do. The module learning outcomes help you to understand what you need to focus on to show off in the best possible way.

Acknowledgements

Many thanks to the TM470 module team, and the follow tutors that I work with.

Permalink Add your comment
Share post

This blog might contain posts that are only visible to logged-in users, or where only logged-in users can comment. If you have an account on the system, please log in for full access.

Total visits to this blog: 4538935